well I believe it has been just over a few weeks since I put an absolutely insane and not possible laser in my Signature wondering who was gonna be the first person to notice and when they were going to notice it. I am going to remove it soon I just wanted to see if someone was ever going to see my INSANE 2.2KW 589nm car mounted laser :crackup::na:
↧
its been over 3 weeks
↧
Were to buy our favourite silicone wire
So just wondering were everybody is buying there wire now that budgetbeams is gone and Jeff-Flaminpyro is unreachable most of the time, Ive bought from so many sellers on eBay and just cant find the good stuff, Jordan was nice enough to send me some but curious were everyone is buying from!
↧
↧
Hello
Well Im pretty well known on the other forum. Ive been a member here since 2012 and well Ive not really been active over here. I decided to come by and see the place and find I really like what I see. So hello here I am.
My interest is in lumia at the moment and spectroscopy which is how I came over to lpf. I also have been looking at the yellow lasers and find soooo much new info on the new diodes. Lots of good research over here.
My interest is in lumia at the moment and spectroscopy which is how I came over to lpf. I also have been looking at the yellow lasers and find soooo much new info on the new diodes. Lots of good research over here.
↧
PWM diode "whines" when not at 100%. Will this shorten life?
Hi --
I'm building a labby using a BlackBuck 8 driver and the new NUBM47 diodes from DTR. I want to control the power output and I'm experimenting with both an analog control voltage on the BlackBuck and using PWM from an Arduino. Using PWM would give me a lot more flexibility, but when the laser is not running at 100% there is an audible whine from the diode. I have not brought this up to full current yet - still running about an amp.
Will this shorten the life of the diode? Does anyone know if it would be safe to the driver to smooth it out with a filter capacitor?
Thanks. Really excited for what I have cookin', but I don't want to break it.
↧
More Sanwu Pocket 488nm and 505nm pics
I thought I would throw a few more pics in here :)
Its a C6 520nm vs 505nm Pocket and a 450nm vs 488nm Cyan. I used the gold laser I got from Laserpointerstore because its the lowest power 450nm I got, I didnt wanna put a 60mw 488nm next to a 1.6W 450nm :crackup:
I wanted to show the meter and the 488 hitting 61mw :)
Its a C6 520nm vs 505nm Pocket and a 450nm vs 488nm Cyan. I used the gold laser I got from Laserpointerstore because its the lowest power 450nm I got, I didnt wanna put a 60mw 488nm next to a 1.6W 450nm :crackup:
I wanted to show the meter and the 488 hitting 61mw :)
↧
↧
NEEDED: Custom Brass Lens Holder
Hi, everyone, especially machinists offering their services.
I am in need of a brass M9x0.5 lens holder designed for a lens with a diameter of 4mm.
The design is simple since I will use adhesive to set the lens in the back of the holder (the side facing the diode) since it needs to approach the diode as closely as possible.
If you can make this for me, send me a quote (PM or a post here is fine).
Thanks for looking.
Daniel
↧
Hi
Hello. I navigated to this site during my research into repairing a laser engraver. As you might have guessed, one issue i'm having is with the laser itself. Lasers are a topic I know little about but i'm finding the subject quite fascinating. I look forward to learning more as I spend my time digesting all the info on offer and asking a few of my own questions along the way.
↧
574nm 36 mW Yellow Laser
I bought this laser from Shenzhen OPTlaser Technologies for $30.00 which included the driver. This laser is a pure lemon yellow color, but because of the way the RGB pixels in the cameras make yellow out of red and green, they all come out looking green. It didn't matter what camera I used either. I'm not going to edit these to try to make them look like they should. That is just too much work. :crackup:
Here is a photo of the laser head and the driver. The heat sinks you see on the driver were not there originally. I put them there as these were the driver output transistor and its driver IC.
![]()
This is a close up of the head. It has a fan on it and because this device pulls 6 watts, it is likely necessary. But, I couldn't feel any heat coming from the module inside.
![]()
Here is a beam shot. It is not even close to the actual color, but it is what all my cameras do when I try to show this color.
![]()
This is the dot at about 18 feet. It is much smaller than the photo, but that is normal for a camera.
![]()
Here is a beam shot where most of the surroundings are out of focus. I thought it was unusual.
![]()
Another beam shot.
![]()
This is a reflected beam shot that caught part of the camera lens.
![]()
And lastly a couple more beam shots.
![]()
![]()
Thanks for having a look. Mine measured 36 mW after I increased the pump diode current a little by turning the multi-turn pot CCW. It remained rock steady at 573.9nm from cold and for a full ten minutes. It never hopped, slid or moved at all during that time. If you are interested in one of these, the email address for the company is:fb@optlaser.com. Shipping is by DHL Express and costs $35.00. But, I got my laser from mainland China in less than 4 days. :yh:
Here is a photo of the laser head and the driver. The heat sinks you see on the driver were not there originally. I put them there as these were the driver output transistor and its driver IC.

This is a close up of the head. It has a fan on it and because this device pulls 6 watts, it is likely necessary. But, I couldn't feel any heat coming from the module inside.

Here is a beam shot. It is not even close to the actual color, but it is what all my cameras do when I try to show this color.

This is the dot at about 18 feet. It is much smaller than the photo, but that is normal for a camera.

Here is a beam shot where most of the surroundings are out of focus. I thought it was unusual.

Another beam shot.

This is a reflected beam shot that caught part of the camera lens.

And lastly a couple more beam shots.


Thanks for having a look. Mine measured 36 mW after I increased the pump diode current a little by turning the multi-turn pot CCW. It remained rock steady at 573.9nm from cold and for a full ten minutes. It never hopped, slid or moved at all during that time. If you are interested in one of these, the email address for the company is:fb@optlaser.com. Shipping is by DHL Express and costs $35.00. But, I got my laser from mainland China in less than 4 days. :yh:
↧
A quick dual review - Lifetime Hosts!
Need to share a couple builds I've done - one was tonight and one was a couple weeks ago...not a full step-by-step this time, but want ya'll to see the pretty things Rich has made!
The 1st host was a 1x10440. I've been making a lot of little boost-driven lasers, and wanted something a bit more powerful. Since we are talking just 1 10440, a boost was still the driver, but I went and maxed out a Pico, then a Flex - with a NUGM01. At around 1.4A - it puts out a decent amount of light!
![]() IMAG2270 by Lewie Wilkinson, on Flickr
IMAG2270 by Lewie Wilkinson, on Flickr
![]() IMAG2271 by Lewie Wilkinson, on Flickr
IMAG2271 by Lewie Wilkinson, on Flickr
With a 3 element glass lens, I'm getting around 500mW of 520nm.
Tonight I put together the Copper 1x14500. Wanting to do something I hadn't done before - I opted to go with 2x14250s and use an Astralist Superdrive V. I have SO many blue builds, I went with another NUGM01 - this time set to 2.2A :wave:.
A couple pics of both hosts and both hosts in action!
![]() IMAG2494 by Lewie Wilkinson, on Flickr
IMAG2494 by Lewie Wilkinson, on Flickr
![]() IMAG2496 by Lewie Wilkinson, on Flickr
IMAG2496 by Lewie Wilkinson, on Flickr
![]() IMAG2512 by Lewie Wilkinson, on Flickr
IMAG2512 by Lewie Wilkinson, on Flickr
![]() IMAG2509 by Lewie Wilkinson, on Flickr
IMAG2509 by Lewie Wilkinson, on Flickr
![]() IMAG2501 by Lewie Wilkinson, on Flickr
IMAG2501 by Lewie Wilkinson, on Flickr
![]() IMAG2504 by Lewie Wilkinson, on Flickr
IMAG2504 by Lewie Wilkinson, on Flickr
Love both of these hosts. The white 10440 obviously will not run very long without overheating, but its fun to have a little white pointer putting out some serious beams!
The modules will likely not live in these hosts forever, but I can say these hosts will bring me much joy no matter what diode/driver/battery combo goes into them. Thanks Lifetime!!!
The 1st host was a 1x10440. I've been making a lot of little boost-driven lasers, and wanted something a bit more powerful. Since we are talking just 1 10440, a boost was still the driver, but I went and maxed out a Pico, then a Flex - with a NUGM01. At around 1.4A - it puts out a decent amount of light!
 IMAG2270 by Lewie Wilkinson, on Flickr
 IMAG2271 by Lewie Wilkinson, on Flickr
With a 3 element glass lens, I'm getting around 500mW of 520nm.
Tonight I put together the Copper 1x14500. Wanting to do something I hadn't done before - I opted to go with 2x14250s and use an Astralist Superdrive V. I have SO many blue builds, I went with another NUGM01 - this time set to 2.2A :wave:.
A couple pics of both hosts and both hosts in action!
 IMAG2494 by Lewie Wilkinson, on Flickr
 IMAG2496 by Lewie Wilkinson, on Flickr
 IMAG2512 by Lewie Wilkinson, on Flickr
 IMAG2509 by Lewie Wilkinson, on Flickr
 IMAG2501 by Lewie Wilkinson, on Flickr
 IMAG2504 by Lewie Wilkinson, on Flickr
Love both of these hosts. The white 10440 obviously will not run very long without overheating, but its fun to have a little white pointer putting out some serious beams!
The modules will likely not live in these hosts forever, but I can say these hosts will bring me much joy no matter what diode/driver/battery combo goes into them. Thanks Lifetime!!!
↧
↧
Ophir 20C LPM with J.Bauer chipset and datalogging.
Hello guys,
I am selling my beloved laserpowermeter. It comes with all the goodies you need to start measuring your lasers (either as a hobbyist or professional). I have used this meter in the past to measure some DIY lasers I sold. Now I dont sell lasers anymore I dont feel the need for such a great piece of equipment. It has been stored in my closet for a few years now. :)
I tested these chips for jerry a few years ago. They work great. I built them in my custom enclosure. I have asked Jerry if i may sell this. And that was ok! :beer:
It comes with:
- the meter
- power cord and EU adapter
- ophir 20C head
- RS232 to USB for win XP win 7
- CH340 to USB for win 10
- laserbee software
I bought the ophir head new and it has been used very lightly (looks brand new). They are known for their versatilety and quick respons times.
If you put a heatsink on the head i am sure you can meter 10W. I have personally never used it above 3W.
You can use the meter standalone with the display to check laser power. You can also simultaneously use the datalogging function on either open LPM or laserbee software. Whatever you prefer. I recently tested the meter on win 10 and everything works great.
I made a video on the meter here (also with pictures):
Price $625,- + shipping and pp fees. Of this money i will donate 50$ to jerry for the awesome work he does.
Greetings,
Robin
↧
Hello LPF! I'm back!
Hey LPF! I joined back in 2010 when I was in college. Tried to build a burning laser on a budget with some buddies with some success (after ruining a couple of diodes). Jayrob gave us some much needed help. Thanks jayrob! Took a little break from the laser building for a few years (school, broke and work) but I've been recently getting back into it (much to the annoyance of the wife).
I already have an Eagle Pair (OD4+ I believe) so I should be good on safety. The only working laser I have currently is one of the cheap Sanwu 304's 405nm 100mW. But I have a 2W 445nm M140 on its way with the host/driver/batteries ready to go!
Anyway, you'll probably see me around asking questions and stuff :D
↧
want to build my first laser, need help choosing module
hello im new to this diy laser stuff, even though Ive read a lot and watched many diy laser videos, Im still confused mostly about lens and modules.
for example I want to buy this diode Sld3232vf Original Sony 50mw 405nm Violet Laser Diode
from this site, #2 in list.
https://www.aam.com.pk/?s=laser&post...&product_cat=0
But Im confused which module in that list is compatible with this diode if any, will the last one in that list "5mw 650nm red laser diode module" work? Also would I use the same lens it comes with, or buy different one?
Also Im mostly limited to just that local site for my location, international delivery just takes forever where I live. Thanks.
↧
Finally....!
Some of you know Ive had the worst of luck trying to build a Red WL pen. Ive killed a few open can diodes and even a couple drivers, regrettably. But, tonight it came together successfully :)
This is nothing new or special to most. Only to me:D. Here are some pics along the way and a couple beam shots. Theres just something about a laser pointer pen that emits BRIGHT Red...I like it:D
Materials: Leadlight host (Thank you, Lifetime17), FlexdriveV5 ~340mA, ML101U29 660nm LOC diode, copper modul, Acrylic lens.
SGD:beer: :beer:
↧
↧
488nm WL Nano Build
Hi again, got my last build of these new diodes done (for now at least).
Around a year ago, I was looking for a WL nano host for cheap to put a 488nm diode into. This was long before the sharp 488's were out, but when we knew they were coming. After a few PM's, another member has graciously offered to send me a dead one he had so long as I post a build using it. I'm a bit late, but when you read this I want to say thank you again :beer:
Onto the build. I always heard that pen builds were extremely difficult, and I put off this one for last thinking it would be an arduous process. I was pleasantly surprised to find out this turned out to be a pretty easy build.
Without any other delay, onto the build!
This is everything that went into making this. Host, caps, button, diode & driver.
![]()
Missing a pic of the internals of the driver, realized after I put it all together... Inside is one of the new Sharp 490nm diodes, set at a very low current to get ~10mW out. This is using one of the Astral PicoDrives (soldered on to the diode and pressed by Paul, thanks!). I've soldered the negative lead from the driver to the case pin on the diode (not pictured).
From there, I needed to attach the positive lead of the diode in series with the push button. These are the push button blank boards offered by laser66.
![]()
Went a little crazy with the solder on the board, the wire did not want to stick to the solder I have. Either way, I've checked to be sure this wasn't shorting itself out anywhere.
![]()
From there, I slid the board into the plastic holder and wrapped the lead around the other end of the board to hide away some slack
![]()
Then comes sliding everything down into the host. This part is tricky to get aligned right on the first try
![]()
It's easy enough to twist the module with something that can grip the plastic holder
![]()
And with that, pop the button in place and screw the head cap on. Throw some batteries in and it's good to go!
![]()
![]()
![]()
![]()
Once again, a huge thanks to Paul for the small soldering work that I'd never be able to do myself, and a huge thanks to the member who sent me this host -- you know who you are. :thanks:
Link to album
Around a year ago, I was looking for a WL nano host for cheap to put a 488nm diode into. This was long before the sharp 488's were out, but when we knew they were coming. After a few PM's, another member has graciously offered to send me a dead one he had so long as I post a build using it. I'm a bit late, but when you read this I want to say thank you again :beer:
Onto the build. I always heard that pen builds were extremely difficult, and I put off this one for last thinking it would be an arduous process. I was pleasantly surprised to find out this turned out to be a pretty easy build.
Without any other delay, onto the build!
This is everything that went into making this. Host, caps, button, diode & driver.

Missing a pic of the internals of the driver, realized after I put it all together... Inside is one of the new Sharp 490nm diodes, set at a very low current to get ~10mW out. This is using one of the Astral PicoDrives (soldered on to the diode and pressed by Paul, thanks!). I've soldered the negative lead from the driver to the case pin on the diode (not pictured).
From there, I needed to attach the positive lead of the diode in series with the push button. These are the push button blank boards offered by laser66.

Went a little crazy with the solder on the board, the wire did not want to stick to the solder I have. Either way, I've checked to be sure this wasn't shorting itself out anywhere.

From there, I slid the board into the plastic holder and wrapped the lead around the other end of the board to hide away some slack

Then comes sliding everything down into the host. This part is tricky to get aligned right on the first try

It's easy enough to twist the module with something that can grip the plastic holder

And with that, pop the button in place and screw the head cap on. Throw some batteries in and it's good to go!


Once again, a huge thanks to Paul for the small soldering work that I'd never be able to do myself, and a huge thanks to the member who sent me this host -- you know who you are. :thanks:
Link to album
↧
Optically corrected pen: MM 638 V1
I've been planning this project for a long time but finally had some time to get around to setting it up today.
The idea: Make a tiny, optical correction assembly to improve the beam quality from high power multimode diodes while minimizing losses and cost.
The materials:
Phase 1: Proof of concept
There are a few hurdles to overcome with this project.
The first is that I don't own my own metal-working tools so I am limited to scraps from disassembled modules and basic tools one might find in a relatively well-equipped garage.
After rummaging through my spare parts box, I found a few pieces I could put together with a little modification to get an adjustable otpics assembly.
The second hurdle is finding the right optics. I went to Edmund Optics and selected a couple lenses that would provide decent correction for the average divergence specifications given by the datasheet for the diode. This required some algebra, a little trigonometry, and less physics. The basic idea is to select focal lengths that provide the same ratio as the divergence angles of the diode's emission axes.
Once I had the materials in hand, it was just a matter of finding the time and doing the work.
The design is crude but effective.
The diode is seated, for now, in a threaded mount so that it can be removed or rotated if necessary.
The first lens is mounted on a threaded ring in a brass tube that threads onto the diode mount.
The second lens is also mounted on a threaded ring in a brass tube that is connected to the first lens assembly by another threaded ring.
That's it.
This design allows me to adjust the z-position of each lens relative to the diode by threading in or out the ring that the lens is to be mounted on.
The lens rotation and x-y position can be adjusted freely. This part is tedious and difficult.
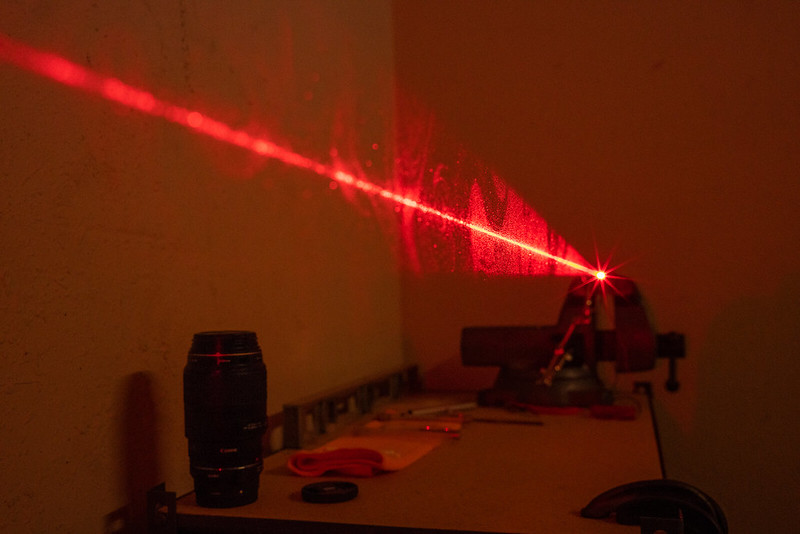
To ensure a good alignment, I first mounted the diode and powered it up above lasing threshold (around 40mW) then redirected the output to an adjacent wall with a first-surface mirror.
The z-position of each lens was set first by crudely aligning the lenses one at a time to achieve the smallest divergence angle at the other side of the garage.
I marked on the wall what I could approximate was the center of the beam profile with a marker. For each lens, I would target this mark for the center of the beam when making adjustments to the x-y position.
When positioned, I applied a small drop of UV-cure liquid plastic to set the optic in place. This required a lot of patience and a steady hand but the process is simple.
Results:
I achieved about 1.5mRad divergence on the fast-diverging axis of the diode.
Unfortunately, while setting the lenses with epoxy for a more permanent hold, I had to disassemble the assembly and when I put it back together, something had changed and the second lens had shifted and the divergence is around 2.5mRad on one axis. This will be corrected for the second iteration of this assembly when it is ready to go into a host.
The module as it is now, is about 35mm long which can be shortened by a couple millimeters by clipping the diode pins. It may be possible to achieve a total module length of about 40mm with the switch board included. I will try my best to keep the size small so that it can fit nicely into a pen.
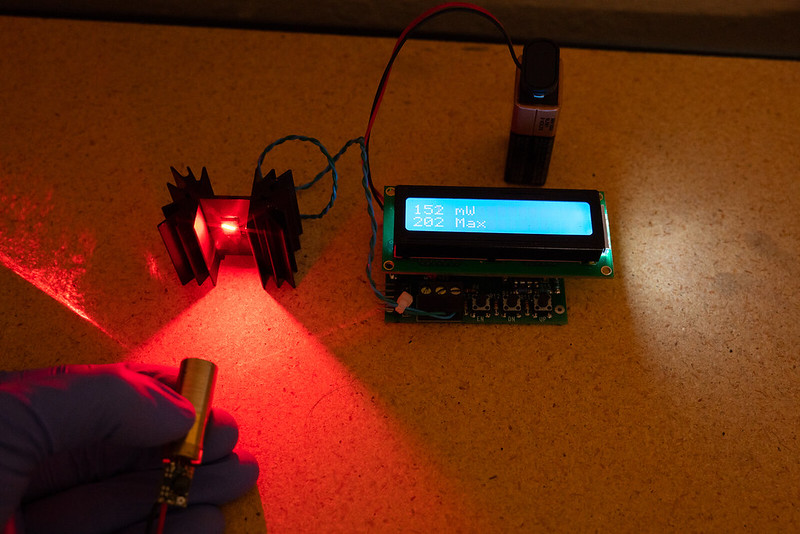
After alignment, I increased the power a bit to check losses to the optics.
The raw output from the diode (no optics) was 200mW. After both correction lenses, I was getting 150mW. This comes out to about 25% loss which I think is quite good when considering that these lenses ended up being a bit too small to collect the entire beam (the divergence of the fast axis is a bit higher than specified on the diode's datasheet) and that the apertures at the first lens cuts off some of the output as well.
400mW is easy to obtain with this setup (and it's bright!).
What I learned:
One issue I have is that the mounting method for this diode does not provide enough heat transfer to the module. A press-fit would be much better. In future renditions, this will be possible if I can get someone to machine the parts I need. Because heat transfer is poor, power drops rapidly at high current input.
Choosing lenses with shorter focal lengths should allow a more compact design but it will be difficult to find such lenses with a large enough clear aperture that will minimize losses.
There is still some crap spilling over the main output modes after correction. This will be difficult to eliminate without spatial filtering (another project) but can be cut down a little with masking using a narrow exit aperture. I have to experiment with this more.
The photos:
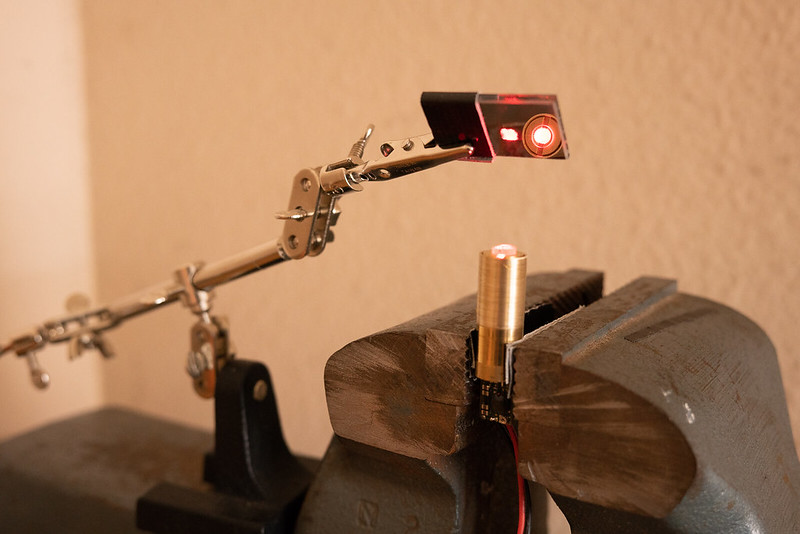
Positioning the first lens
![]()
Positioning the second lens
![]()
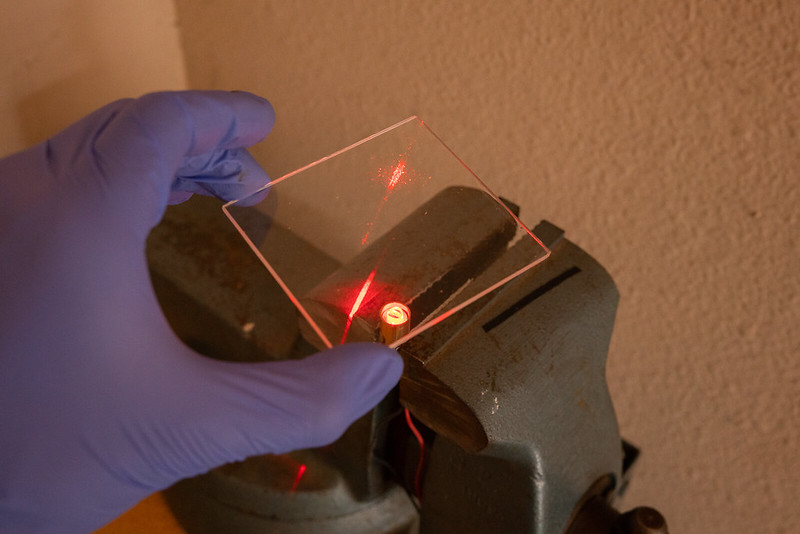
I can check for the presence of a positive focal point and observe the general profile by passing the beam through clear acrylic
![]()
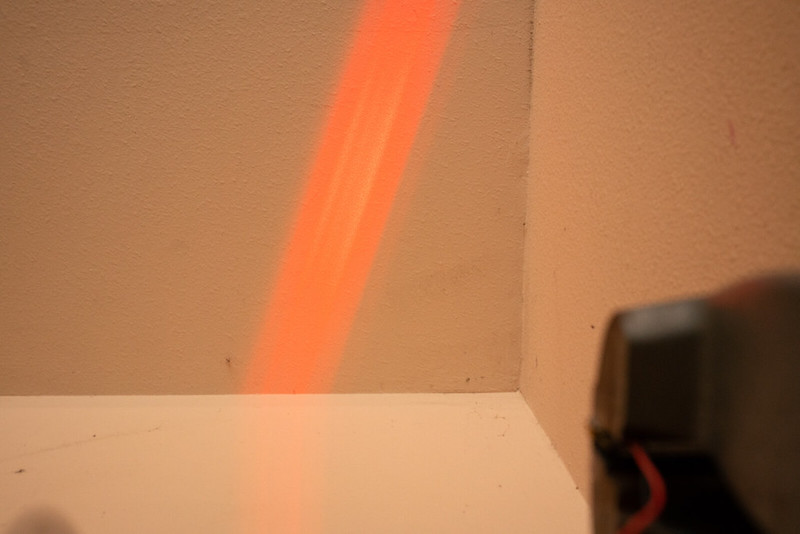
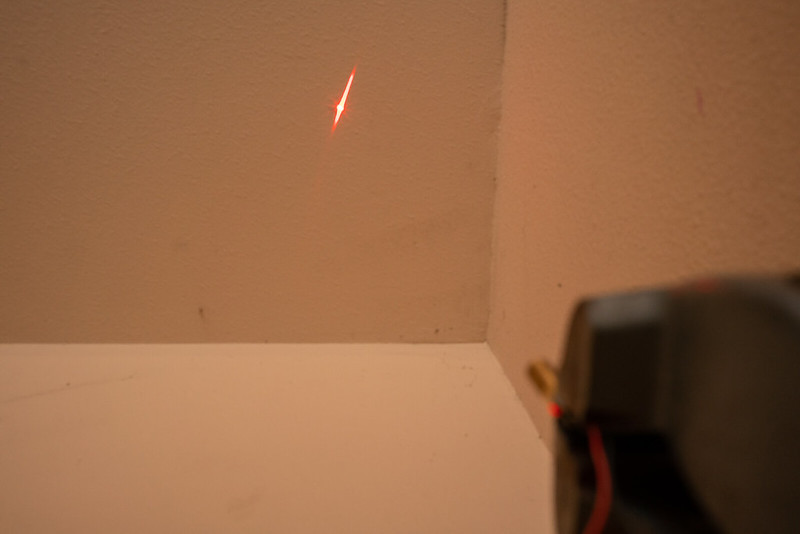
Before optical correction
![]()
After the first lens is roughly aligned
![]()
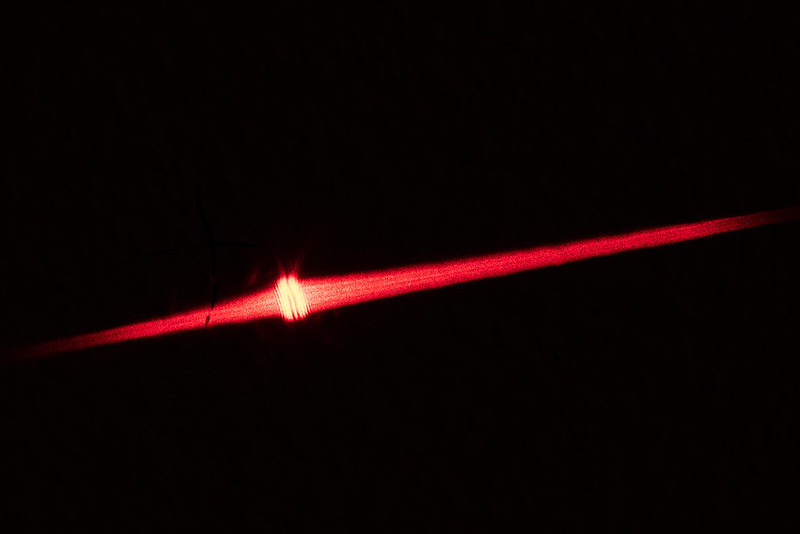
After the second lens is roughly aligned you can see that the main portion of the output is concentrated and there is some spill from the uncollimated modes at low intensity on either side of the beam
![]()
A close-up of the profile before final alignment (slightly imperfect collimation)
![]()
A first-surface mirror can be used to position the beam in a more convenient location so the lenses can be installed vertically with the help of gravity to keep them in place
![]()
A power test showing raw output power (bottom measurement) and the power after optics are installed (top measurement)
![]()
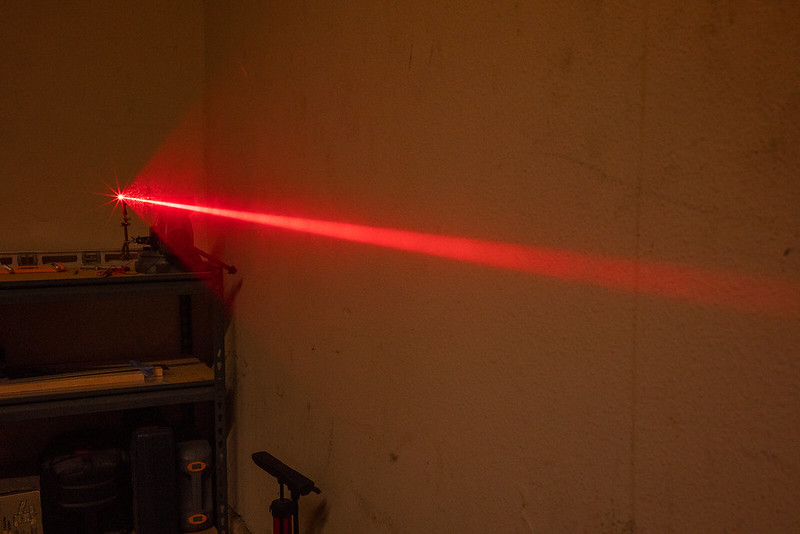
Beamshots. The perspective exaggerates the beam size but divergence is lower than with 3-element glass lens
![]()
![]()
Coming soon:
Phase 2: Fine-tuning and assembly into host
(I don't have a spare host yet)
The idea: Make a tiny, optical correction assembly to improve the beam quality from high power multimode diodes while minimizing losses and cost.
The materials:
- HL63193MG 638nm Diode
- 6mm cylindrical lens (AR coated for 633nm)
- 25mm cylindrical lens (AR coated for 633nm)
- Flexdrive V5
- Spare parts
Phase 1: Proof of concept
There are a few hurdles to overcome with this project.
The first is that I don't own my own metal-working tools so I am limited to scraps from disassembled modules and basic tools one might find in a relatively well-equipped garage.
After rummaging through my spare parts box, I found a few pieces I could put together with a little modification to get an adjustable otpics assembly.
The second hurdle is finding the right optics. I went to Edmund Optics and selected a couple lenses that would provide decent correction for the average divergence specifications given by the datasheet for the diode. This required some algebra, a little trigonometry, and less physics. The basic idea is to select focal lengths that provide the same ratio as the divergence angles of the diode's emission axes.
Once I had the materials in hand, it was just a matter of finding the time and doing the work.
The design is crude but effective.
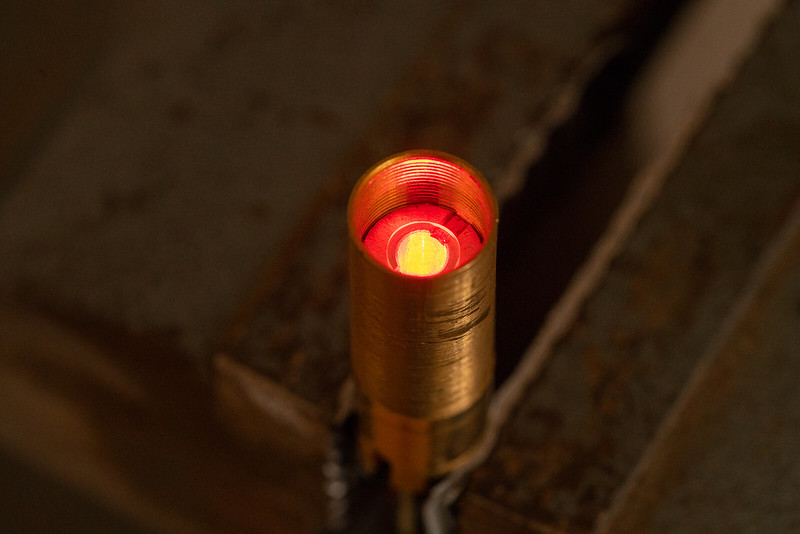
The diode is seated, for now, in a threaded mount so that it can be removed or rotated if necessary.
The first lens is mounted on a threaded ring in a brass tube that threads onto the diode mount.
The second lens is also mounted on a threaded ring in a brass tube that is connected to the first lens assembly by another threaded ring.
That's it.
This design allows me to adjust the z-position of each lens relative to the diode by threading in or out the ring that the lens is to be mounted on.
The lens rotation and x-y position can be adjusted freely. This part is tedious and difficult.
To ensure a good alignment, I first mounted the diode and powered it up above lasing threshold (around 40mW) then redirected the output to an adjacent wall with a first-surface mirror.
The z-position of each lens was set first by crudely aligning the lenses one at a time to achieve the smallest divergence angle at the other side of the garage.
I marked on the wall what I could approximate was the center of the beam profile with a marker. For each lens, I would target this mark for the center of the beam when making adjustments to the x-y position.
When positioned, I applied a small drop of UV-cure liquid plastic to set the optic in place. This required a lot of patience and a steady hand but the process is simple.
Results:
I achieved about 1.5mRad divergence on the fast-diverging axis of the diode.
Unfortunately, while setting the lenses with epoxy for a more permanent hold, I had to disassemble the assembly and when I put it back together, something had changed and the second lens had shifted and the divergence is around 2.5mRad on one axis. This will be corrected for the second iteration of this assembly when it is ready to go into a host.
The module as it is now, is about 35mm long which can be shortened by a couple millimeters by clipping the diode pins. It may be possible to achieve a total module length of about 40mm with the switch board included. I will try my best to keep the size small so that it can fit nicely into a pen.
After alignment, I increased the power a bit to check losses to the optics.
The raw output from the diode (no optics) was 200mW. After both correction lenses, I was getting 150mW. This comes out to about 25% loss which I think is quite good when considering that these lenses ended up being a bit too small to collect the entire beam (the divergence of the fast axis is a bit higher than specified on the diode's datasheet) and that the apertures at the first lens cuts off some of the output as well.
400mW is easy to obtain with this setup (and it's bright!).
What I learned:
One issue I have is that the mounting method for this diode does not provide enough heat transfer to the module. A press-fit would be much better. In future renditions, this will be possible if I can get someone to machine the parts I need. Because heat transfer is poor, power drops rapidly at high current input.
Choosing lenses with shorter focal lengths should allow a more compact design but it will be difficult to find such lenses with a large enough clear aperture that will minimize losses.
There is still some crap spilling over the main output modes after correction. This will be difficult to eliminate without spatial filtering (another project) but can be cut down a little with masking using a narrow exit aperture. I have to experiment with this more.
The photos:
Positioning the first lens

Positioning the second lens
I can check for the presence of a positive focal point and observe the general profile by passing the beam through clear acrylic
Before optical correction
After the first lens is roughly aligned
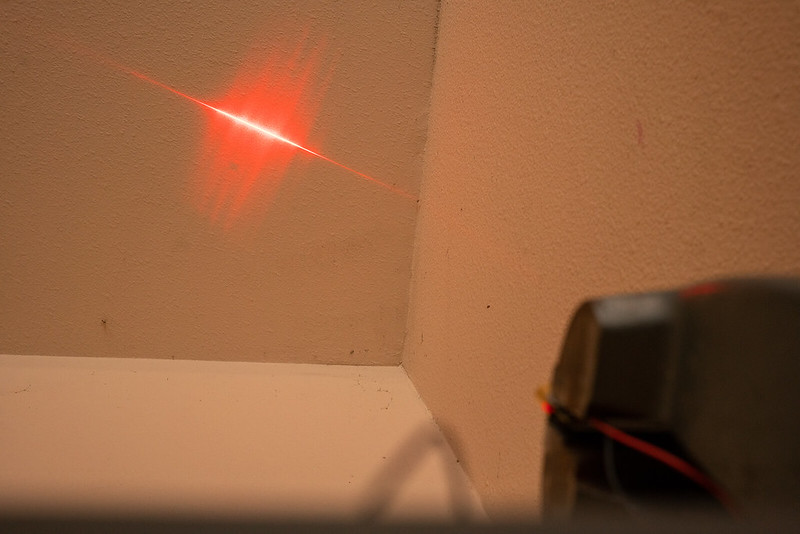
After the second lens is roughly aligned you can see that the main portion of the output is concentrated and there is some spill from the uncollimated modes at low intensity on either side of the beam
A close-up of the profile before final alignment (slightly imperfect collimation)
A first-surface mirror can be used to position the beam in a more convenient location so the lenses can be installed vertically with the help of gravity to keep them in place
A power test showing raw output power (bottom measurement) and the power after optics are installed (top measurement)
Beamshots. The perspective exaggerates the beam size but divergence is lower than with 3-element glass lens
Coming soon:
Phase 2: Fine-tuning and assembly into host
(I don't have a spare host yet)
↧
1 battery or 2 batteries configuration for laser?
Hi
i wanted to ask what is the best and what advantages/disadvantages is for a laser with the option for having:
2 x 18350 batteries
or
1 x 18650 battery
will the 2x18350 batteries will give me more power?
the lasers are 1W 520nm and 4W 470nm if that would make a difference
thank you in advance
i wanted to ask what is the best and what advantages/disadvantages is for a laser with the option for having:
2 x 18350 batteries
or
1 x 18650 battery
will the 2x18350 batteries will give me more power?
the lasers are 1W 520nm and 4W 470nm if that would make a difference
thank you in advance
↧
Uploading photos.
Though I've done a search it bore no fruit. Which prefered apps do you like that allows resizing to post them on this site? Thanks.
↧
↧
Laser Lab and Hotel with Optics Manufacturing, and way more
This place has a Laser Lab, machine shop, electronics lab...
public memberships (affordable $29)
Needs your support.
National Makerspace
http://nationalmakerspace.com
It is a national public community center that provides technology, manufacturing equipment and educational opportunities that allows members to design, prototype and manufacture items using tools and equipment that would otherwise be inaccessible or unaffordable.
Workshops, Labs, Hotel, car rentals, Materials retail warehouse, All in one place.
Everything. Right where you need it.
With every Tool/Equipment you need to make anything.
There is a Laser Lab (lab is a clean room / faraday cage).
Femtosecond Laser
Argon Ion Lasers
Nanosecond Lasers
Assortment of lasers
Lots of optics of every type
Beam power meters
Optical tables
8ch Picosecond Event Time-Correlated Single Photon Counting (TCSPC) system
Automated robotic storage system
3D Printer that can Print in stainless steel.
CNC mill and lathes
CNC Optics Manufacturing
OptiSonic 500 grinder and UFF300 Polishing.
Ideal for manufacturing a variety of different optics up to 300mm in diameter, including spheres, aspheric lenses, aspheric cylinders, freeforms and more.
Page 79 of PDF is Laser related
Link: Stripped list of equipment, you will have to skip to the Laser Lab area
Link: Easier, if you download it, Then you get easy links to each section on the side bar
![]()
public memberships (affordable $29)
Needs your support.
National Makerspace
http://nationalmakerspace.com
It is a national public community center that provides technology, manufacturing equipment and educational opportunities that allows members to design, prototype and manufacture items using tools and equipment that would otherwise be inaccessible or unaffordable.
Workshops, Labs, Hotel, car rentals, Materials retail warehouse, All in one place.
Everything. Right where you need it.
With every Tool/Equipment you need to make anything.
There is a Laser Lab (lab is a clean room / faraday cage).
Femtosecond Laser
Argon Ion Lasers
Nanosecond Lasers
Assortment of lasers
Lots of optics of every type
Beam power meters
Optical tables
8ch Picosecond Event Time-Correlated Single Photon Counting (TCSPC) system
Automated robotic storage system
3D Printer that can Print in stainless steel.
CNC mill and lathes
CNC Optics Manufacturing
OptiSonic 500 grinder and UFF300 Polishing.
Ideal for manufacturing a variety of different optics up to 300mm in diameter, including spheres, aspheric lenses, aspheric cylinders, freeforms and more.
Page 79 of PDF is Laser related
Link: Stripped list of equipment, you will have to skip to the Laser Lab area
Link: Easier, if you download it, Then you get easy links to each section on the side bar

↧
Hey dear community
Hey there :)
My name is jack painz in real life and i am 20 years old :).
I am not a laserpointer fan, but i like laserpointers if it makes sense.
I dont use them daily. I use them rarely but if i use them, i have alot of fun *_*.
I am living currently in germany, and moved from USA to here.
And btw, i heard about this forum ago long years and never decided to register my self here TILL a week ago :) since i am interested buying a new laserpointer for a cheap price and i dont want to get scammed etc.
Ps. I LOVE this forum :))) and i am excited to learn MORE about lasers.
↧
Happy memorial day lpf !!!!
Hi LPF, :wave::friend:
Happy Memorial Day everyone hope all of us have a great day .. :beer:
Rich:)
Happy Memorial Day everyone hope all of us have a great day .. :beer:
Rich:)
↧