I'm a business grad and I've worked across many non-technical functions, however my passion has always been Electronics and DIY. I've been tinkering since I was 5 years old, mostly with my dad who was also an electronics engineer. About 2 years ago I started building digital fabrication tools and after building 2 CNCs, 1 laser engraver and a 3D printer, this year I finally took the plunge this year to become an entrepreneur and make electronics for digital fabrication tools. This is my website for now but its about to undergo a radical change - https://classbproject.com. Apart from this I do a lot of photography and I'm a very outdoor-sy person :)
↧
Hello from India
↧
Spectrometer Calibration
Calculating the numbers to Calibrate a Spectrometer requires the calculation of the 3rd order Polynomial values.
The easiest way I have found is to use an Excel Spreadsheet. I will go thru the steps involved. After you have done it once it's pretty straight forward to do.
Excel has a Plugin called "Data Analysis Tools". It's not included with the standard install of Excel so you will need to find the Plugins / Addons tab and select Data Analysis Tools and Excel will download and install it for you.
I have included an Excel Spreadsheet to get you started. Download Excel Polynomial Sheet
Once you load the Sheet into Excel you can enter your data. You will need a min of 3 sets of calibration points. The sample sheet shows 6 points. Each point consists of the Actual Wavelength and the Pixel number. The Pixel ^ 2 and Pixel ^ 3 are automaticaly calculated.
Once you enter your data you need to Click on the "Data" Tab then the "Data Analysis" Tab.
![]()
After doing that you need to select "Regression" from the box that appears. Then click ok.
![]()
The next step is to select the data input ranges. Click on the "Input Y Range" tab and highlight the values for wavelength as shown in the Pic then hit enter.
![]()
![]()
Next we need the "Input X Range". Now select all the Pixel Data. All 3 colums then hit enter.
![]()
![]()
Finnaly we need to tell Excel were to place the output results.
Click the "Output Range" button. Then Output range selection box. Now select an area on the sheet were to place the data. Were you place it is not important. Then hit enter.
![]()
![]()
![]()
Now for the magic. Click on the OK button and after a short time the output results will be displayed.
![]()
The 4 Pieces of Date we require for calibration is the 4 next to the arrow. From top to bottom.
Intercept
X Variable 1
X Variable 2
X Variable 3
That is the data to enter into the calibration box in the Spectro software.
One thing you need to be aware of is the limits of the calibration data. It is only accurate between the Max and Min calibration points. If you try to measure a laser above the Max calibration point or below the Min calibration point there will be huge errors. The Calibration curve can even wrap around at either end.
IE, If you have a Min calibration point at 490nm and try to meassure a laser at 450nm the reading will be very innacurate. The same thing will happen at the upper limit.
I have done this quickly at work. If there are errors or any questions please ask.
The easiest way I have found is to use an Excel Spreadsheet. I will go thru the steps involved. After you have done it once it's pretty straight forward to do.
Excel has a Plugin called "Data Analysis Tools". It's not included with the standard install of Excel so you will need to find the Plugins / Addons tab and select Data Analysis Tools and Excel will download and install it for you.
I have included an Excel Spreadsheet to get you started. Download Excel Polynomial Sheet
Once you load the Sheet into Excel you can enter your data. You will need a min of 3 sets of calibration points. The sample sheet shows 6 points. Each point consists of the Actual Wavelength and the Pixel number. The Pixel ^ 2 and Pixel ^ 3 are automaticaly calculated.
Once you enter your data you need to Click on the "Data" Tab then the "Data Analysis" Tab.

After doing that you need to select "Regression" from the box that appears. Then click ok.

The next step is to select the data input ranges. Click on the "Input Y Range" tab and highlight the values for wavelength as shown in the Pic then hit enter.


Next we need the "Input X Range". Now select all the Pixel Data. All 3 colums then hit enter.


Finnaly we need to tell Excel were to place the output results.
Click the "Output Range" button. Then Output range selection box. Now select an area on the sheet were to place the data. Were you place it is not important. Then hit enter.


Now for the magic. Click on the OK button and after a short time the output results will be displayed.

The 4 Pieces of Date we require for calibration is the 4 next to the arrow. From top to bottom.
Intercept
X Variable 1
X Variable 2
X Variable 3
That is the data to enter into the calibration box in the Spectro software.
One thing you need to be aware of is the limits of the calibration data. It is only accurate between the Max and Min calibration points. If you try to measure a laser above the Max calibration point or below the Min calibration point there will be huge errors. The Calibration curve can even wrap around at either end.
IE, If you have a Min calibration point at 490nm and try to meassure a laser at 450nm the reading will be very innacurate. The same thing will happen at the upper limit.
I have done this quickly at work. If there are errors or any questions please ask.
↧
↧
Greetings
Greetings everyone,
Ive been around a while now, and decided to make an account.
I'm a 22 year old electronics student from belgium.
I have already have some knowledge in safety regarding lasers, and I have worked with low power lasers (1-5mW) before. Thats about how far my expiriance goes tho.
Looking to get some info around here on these magnificant things that can probably be used to take over the world someday :)
↧
Mr Steak's laser rifle
Short introduction, Im a student in electronics and got quite some experiance in developing embedded systems and making mechanical drawings for CNC and 3D printing purposes. Im looking mostly for information and doing research for the next month, so i can get started on this project in the summer.
Here is my idea:
I was thinking of using 2 lasers. One to give a somewhat bigger visual dot, and the other one with some more focus for melting/ingraving. Those two would then be combined with some sort of optics so they overlap. Looking for preferably blue or purple beams with power between 1W-7W.
The lasers would be fired for about half a second. Should be enough time to get a good view of light on the target you hit, and for the focused laser to leave a small mark. (not sure about this yet, but its just to give you an idea what it would be used for).
The entire thing would be controlled by a microcontroller on a pcb that will read the input of an electronic trigger, control a bunch of leds that will make it look better. Im also thinking of adding 2x blue-7 seg displays where i could represent the charge left in the battery (form 0-99) if i can find a way to make that happend.
the gun itself would be used as a heatsink. I believe that should not be an issue to still hold it without getting burned as the surface area is quite big to disperse the heat. Roughly 60% of the gun would be aluminium, 30%
acrylic glass and the remaining parts will be of black plastic for the handheld parts. The total lenght i estimate to be 60cm.
I'd love to make my own driver for this, but it doesnt seem to be easy to find High powered lasers that come without those. Anyone who can point me in this right direction for driver guidelines and laser diodes without driver would be a great help.
So any input on what laser, optics, batterys or power supply to use is greatly appreciated.
Here are the parts i tought might be interesting for this project.
NUBM44 ( https://www.ebay.com/itm//171841770497 )
And if I end up not making a driver myself:
BlackBuck 8M - 8A Buck Laser Driver ( https://www.ebay.com/itm/182404712160 )
If you suggest new parts, keep in mind that the buget for this thing is around 500 euro (about 600 dollar). for the laser, optics and driver combined.
Ill be around to post progress when i get started when i've gathered enough information.
↧
Lazerer lzsk 532nm 400mw issues
Hello LPF! Believe it or not this is my 3rd lazerer 400mw "stick" laser I've owned. I've bought and sold 2 and kept this one for the long haul because It was such a well made unit to me. I bought this laser back when lazerer was the #1 reccomended company on this forum. Some 5 years ago. Long story short this one failed on me. It's not a battery issue or a tail cap issue. Either the driver or the diode called it quits. My question is; Do these lasers have an expected time where they are expected to fail? Is 5 years a respectable time for one of these high powered handheld lasers to last? And last, should I try to salvage this laser or, count my blessings a Chinese laser made it this long?
Thanks in advance!
Thanks in advance!
↧
↧
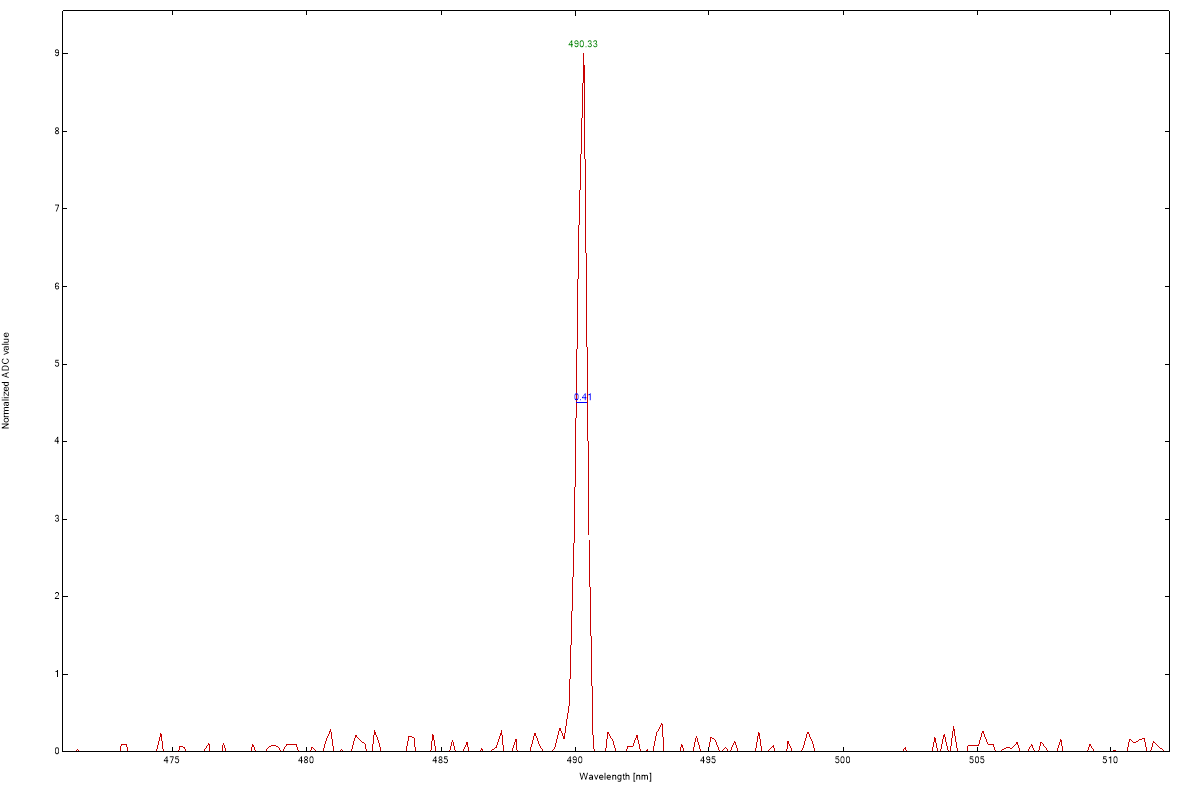
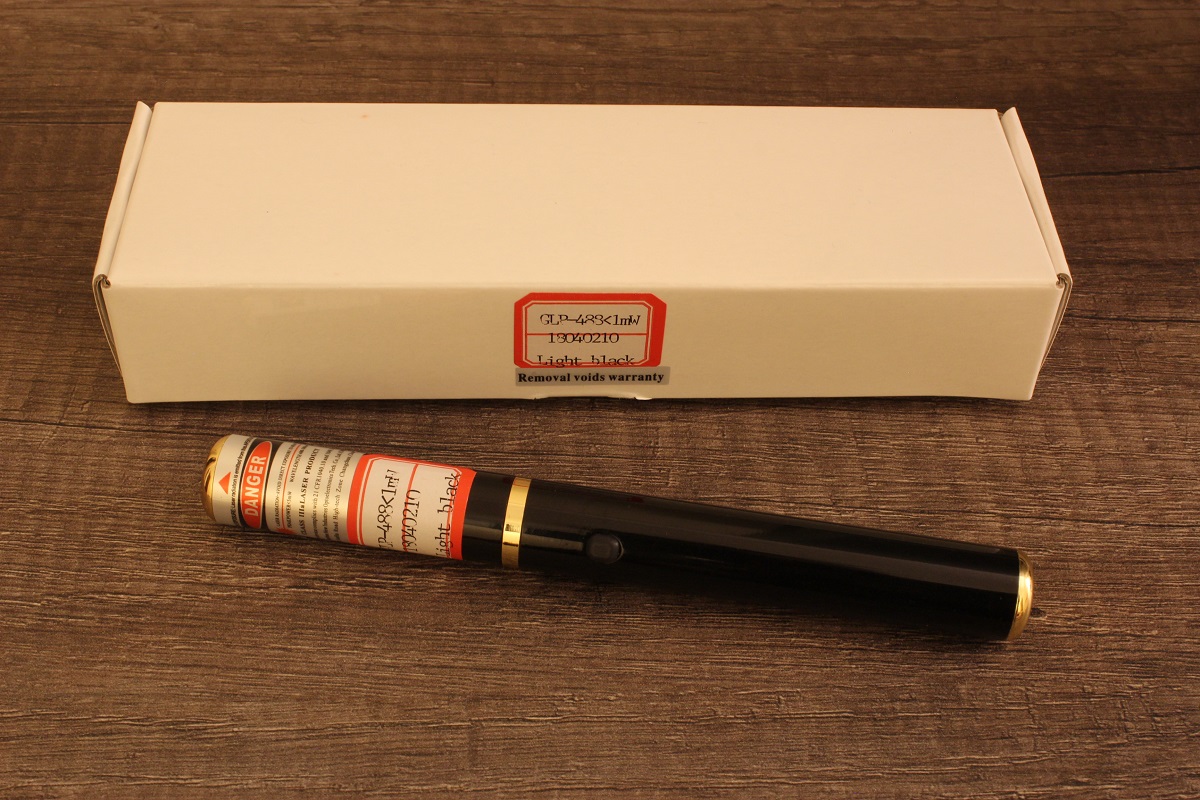
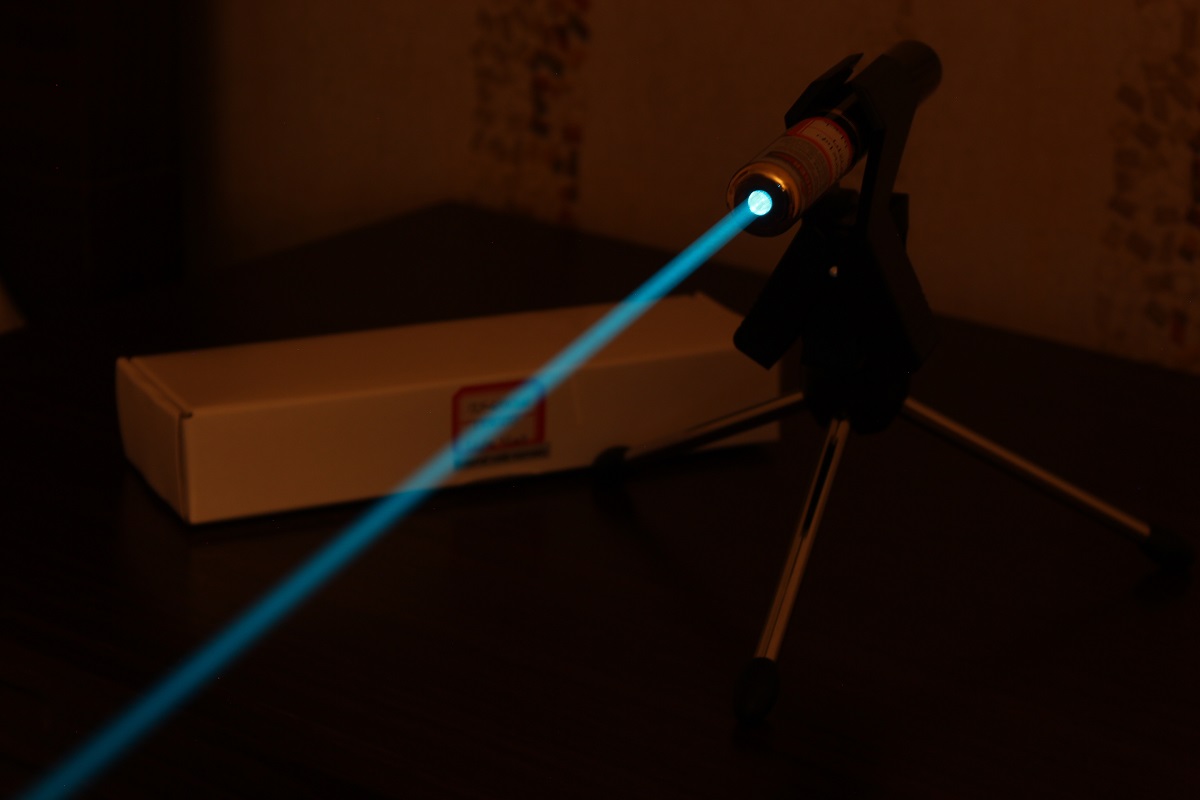
SOLD: CNI GLP 490nm
Up for sale a 5-10mW CNI GLP 490nm
I ended up getting two GLPs at 490nm so I decided to let go of the extra one.
It uses two CR2 batteries.
Asking $OLD shipped.
![]()
![]()
![]()
I ended up getting two GLPs at 490nm so I decided to let go of the extra one.
It uses two CR2 batteries.
Asking $OLD shipped.
↧
Florida Laser Enthusiast Meeting, May 25th and 26th
Hi all, there will be a Florida Laser meet (FLEM) next weekend in Tavares, FL. This is an event that is similar to SELEM but MUCH smaller with a very small venue. There will be plenty of laser shows and shop talk. All laser freaks are invited to attend! For more information you can send me a PM or visit the other big laser site for details.
Thanks!
Thanks!
↧
powerful IR lasers?
hey everybody this is my first post to the forums. i was wondering, had anyone ever made a powerful (1W+) laser in the high end of the near infrared spectrum (1064nm, etc) for burning?
i realize special precautions would have to be taken with something like this. some people may wonder what anyone would want it for, but i just think it would be cool to burn holes in stuff with an INVISIBLE beam!
i realize special precautions would have to be taken with something like this. some people may wonder what anyone would want it for, but i just think it would be cool to burn holes in stuff with an INVISIBLE beam!
↧
hi i'm new here
Encap said i should make a thread here introducing myself so here we go. im 38 years old and live in iowa. ever since i was a kid i've liked crazy and dangerous science projects. i used to make homemade harpoon guns and flamethrowers as a kid. as an adult i'm not as much into stuff like that as i used to be but i havent entirely grown out of it. i used to enjoy the kit builds in "nuts and volts" magazine (if anyone is familiar.)
guess that's all i have to say. if anyone is worried about me blinding airline pilots with lasers and bringing attention to your hobby, dont worry - i wouldnt do anything like that. but if i can figure out how to build a superpowerful handheld laser that will cut a tree in half or something, i probably will
guess that's all i have to say. if anyone is worried about me blinding airline pilots with lasers and bringing attention to your hobby, dont worry - i wouldnt do anything like that. but if i can figure out how to build a superpowerful handheld laser that will cut a tree in half or something, i probably will
↧
↧
Wanted To Buy: ThorLabs WR1 Can Opener
Did you spend your hard earned cash to buy the WR1 Can Opener only to use it once or twice? Is it now just sitting around gathering dust? Want to get some of that money back? Sell it to me!
![]()
Please shoot me a PM if you have a WR1 and would rather have some cash instead.

Please shoot me a PM if you have a WR1 and would rather have some cash instead.
↧
FS: 170$ ~2W violet laser MM, host copper brass
dear, i have just complete my building with this host:
- It use 1 x 18650 (not iclude)
- G2 len include
- Cost ship 14usd
![]()
![]()
![]()
[IMG]
![]()
![]() [/IMG]
[/IMG]
![]()
![]()
![]()
![]()
![]()
![]()
my video:
- It use 1 x 18650 (not iclude)
- G2 len include
- Cost ship 14usd


[IMG]

 [/IMG]


my video:
↧
Evil Genius.
so I watched the short documentary on Netflix about the Pizza Collar Bomb bank robbery in Erie Pennsylvania back in 2003. I was very young when this happened so of course i dont recall any of it. I have to say this was a very fascinating Documentary.
has anyone seen this Documentary or actually remembering it happening?
has anyone seen this Documentary or actually remembering it happening?
↧
laserland power supplies
I have to say that Laserlands or Basrem make nice heads but their 12v power supplies are SH*&^EW and one member here is right CHEAP and I am about to throw it through the window. the molex connector falls apart. I solder the wires on.. still don't work I had a devil of a time to attach it to an aluminum plate and then i have to find a 12v power supply on and on and on. I hate HATE HATE HATE Basrem 12v power supplies and the next time I order one of their lasers it BETTER come with a 110v power supply. I think it is fried. and I hope they send me a new one. Still waiting on my replacement laser. I bet the flickering on the other one is power supply issues guarantee it their heads I think are great. they need to sober up their power supply manufacturing ..
↧
↧
frustrated
Have any of you guys sometimes get so disgusted you want to throw in the towel and quit? I mean it's been lions 10 Christians 0 . I am tired of this fight. this RGB is the last straw. Need some encouragement I had nothing but trouble with this cheap power supply from laserlands. and now it don't work, I am trying to get this laser I ordered on Ebay and paypal won't release my funds. Just not been a good week.
↧
The Cyan Cannon Build is done
Cyan Cannon Epic Build
Well....at long last......The " Cyan Cannon " build is DONE...Stick a fork in it !! The beam is as perfect as I can make it...as far as my eye can see…...it is perfectly aligned !!
This build took several twists and turns...many, many design evolutions....much was learned....many, many frustrating moments...many designs....and redesigns....and modifications !!!
An extraordinary degree of patience were consistently delivered by Mr. Alaskan ….who pledged his patronage and funds for the build !!!... He came on board...sometime after the project was initially proposed and the build was started. He has been waiting a LONG time....and I just cannot find the words to really express how grateful I am for his understanding!!!
I have been driven by the "Demon of Perfection" for this project....and plagued by technical difficulties and set backs !! I have had other commission work slip in the que……allowed by the good nature of The Alaskan…whom has an endless amount of patience. So…..for that ….I apologize to Chris…and to all who may still be following this exceedingly LONG build.
But…She is done….at long last….and….looks and works….beautifully.
General Description
Allow me to refresh the reader as to just what the “ Cyan Cannon” project is.
The Cyan Cannon (CC) is a Hand Held / Combiner Laser unit. It incorporates the NDG7475 Green Laser Diode combined with the NUBM07 Blue Laser Diode. Both these diodes are Multi Emitter / High power diodes with an Astigmatic beam geometry ( Read uncorrected beam takes the shape of a line at a distance ). Both diodes demand correction with Cylindrical Lens optics to modify the beam down to an acceptable geometry and divergence. The goal……a Cyan/Aqua beam, High Power, Adjustable color output, Good Thermal management, Small as possible footprint, Low beam divergence accomplished with Corrective Optics, Reasonable cost, Sufficient run time….in a Hand Held Format !!! Such a project has not been done before !! No small order for sure !!!!!
Some Specifics
Power for the LD drivers is provided by a series arrangement of two (2) 26650 Lipo Cells.
The Host for this unit was a modified 2 D Cell Aluminum Maglite Flashlight.
A high amp/10A On/Off Automotive switch was substituted for the original Maglite I/O switch.
The runtime looks to be about 40 min @ the Cyan output.
Both LD’s are collimated with a G2 Lens and the focus is set @ infinity.
A set of 6X Cylindrical lenses are used for beam correction.
A Beam Expander is employed for final Optical correction.
H-BE description
Between the Host and the Beam Expander is the unit I label as the H-BE….which stands for…Host to Beam Expander. As you can see in the drawings and pictures….the H-BE is machined from a solid Rod raw stock of 6061 Aluminum.
The H-BE has a machined flat platform section (which is machined into the bar stock) and this flat provides the surface to which to Laser Diode’s, Planar Optics and Cylindrical Optics are bolted to. At the back end of the H-BE, a machined recess accepts the Maglite host. At the front end of the H-BE, a second machined recess accepts a Beam Expander. Both Host and BE are fixed with set screw spaced at 120 degree apart.
LD Drivers/Power output
The driver used for the NDG7475 is the Super X Drive-SXD-V3 set to deliver 2.2A. The driver used for the NUBM07 is the Worsee Black Buck 8A set to provide 4.5A. Final combined Optical Power Output comes in at 6.1 Watts.
Color selection/adjustment
Somewhere….during this long build journey…it was decided to include the ability to dial down the NUBM07 Blue to achieve a “ Color Mix “ attribute. The 0-5V modulation feature of the Worsee driver is PERFECT. Small…and does the job !! A Bourns 10K Pot varies the (0-5) VDC delivered to the 8A driver by a simple three (3) wire attachment between the Driver and the Pot.
Now, the result is this; Dialed full down, the 520 nm Green line is only visible. Set at full on, the Blue 465 nm line almost completely over powers the Green line. One sees Royal Blue….with just a hint of Green.
Now….to emit the Cyan color, that Beautiful Blue/Green Aqua mix…..just dial down the Blue LD !!! I estimate, the Cyan Color is projected….at about 45% of the Blue LD power.
Copper Turret-LD Module mount
The diodes are purchased from DTR and are pressed into the standard DTR 12mm Copper Modules units . The Copper Modules are then secured into a Copper Block I call the Turret…. in parallel alignment. This Turret is then bolted to the flat section of the H-BE. All the Combiner Optics and Cylindrical Optics are also fixed to this flat platform on the H-BE.
Beam Path combining
The beam propagation is combined using Planar optics; One FS Bounce mirror and one Dichroic Mirror-Filter (Pass Green/Reflect Blue).
Blue Beam Path
A Front Surface bounce mirror steers the Blue beam 90 Deg left after it leaves the LD module. The Blue beam then strikes a Dichroic -Reflect Blue/Pass Green filter. The Blue beam then takes another 90 Deg turn…headed toward the Cylindrical Optic lenses.
Green Beam Path
The Green beam leaves the LD module. It passes right thru the Dichroic Filter and continues onward headed toward the Cylindrical Optic lenses.
Combined Blue/Green Path
It is at exactly at this spot/point….where the two beams meet…at the surface of the Dichroic Mirror/Filter….that they combine and go forward along a common axis. I call this condition “ Beam-On-Beam”. The Planar optics are epoxy fixed to the standard Brass Tension Flexmount units from Laser Show Parts. These Flexmount units provide the final fine adjustment/alignment required. The Flexmount units are secured to a special Brass unit identified as the Mount to Platform Coupler ( MTPC). The MTPC is then secured to the H-BE. Each Flexmount unit can be adjusted for Pitch and Yaw. Due the bolt down system used by the MTPC, the Flexmounts can be moved on the X/Y to achieve the Beam-On-Beam state.
Is it a completely PERFECT Beam-On-Beam combination….Well…If you want perfect….wait till you meet your Maker !!! No….at some distant, distant point ….the beams do diverge. But…If I cannot see it…WHO CARES !!! I imagine…on the Lunar surface….the beams have some degree of separation….SO ???
Cylindrical Optics
The next step is to use a pair of Cylindrical optics…to correct the Astigmatic nature of our diodes. I used a pair of 6X lenses from Opt Lasers…First a Plano Concave ( PCV)….then a Plano Convex ( PCX ). These lenses expand the Slow Axis so…the resulting beam geometry is not a line….but a round cornered rectangle. Again…..NOT a perfect circle….or a Perfect box….but very close. The Cylindrical Optics are mounted on a custom Aluminum adjustable mount labeled the RBT.
Beam Expander
The final optical is the Beam Expander. This unit is fixed to the end of the H-BE. The Beam expander used in this application is the 3X Melles Griot 09 LBZ 001. This BE was supplied by the Alaskan and is adjustable.
Final Blah, Blah, Blah
So…See the attached pics. They tell the story !! See the Beam Shots….What a Great Color….what a Great( And SAD) Day when this completed unit will be shipped to the Alaskan !! As always…it has been a privilege to complete this project and present these travels to LPF. I trust you will find these build details…. educational and inspiring !
The next build…is for ME !!!! Another Combiner…of course !!! I want Lime Green !!!!....and the build shall be labeled…. “ The Chartreuse Coruscation “…stay tuned for details !! I will …of course use the lessons learned in building the Cyan Cannon.
” To Infinity Focus…and Beyond “
CDBEAM
Note: Pics and drawings in the next two (2) post's
↧
Exploding Vape Battery Kills Man
Ouch.... Probably a very cheap Li-ion battery.
https://www.yahoo.com/lifestyle/flor...232458630.html
An autopsy has confirmed that a vape pen was to blame in the tragic death of a Florida man on May 5. This incident marks the first confirmed case in which an e-cigarette explosion resulted in a fatality. The 38-year-old was killed when his vape pen exploded, which sent projectiles into his head, and started a small fire in his home in St. Petersburg, Florida.
According a report from the Tampa Bay Times, Tallmadge DElia was found on May 5 in bedroom of his familys home. The autopsy lists cause of death as projectile wound of head when the pen exploded, at least two pieces of shrapnel struck him in there. Moreover, the victim suffered burns on about 80 percent of his body.
While there have been at least 195 incidents in which a vape pen or e-cigarette exploded or caught fire between 2009 and 2016, no deaths were reported in that time period. However, those incidents did result in 133 injuries, 38 of which were severe, the U.S. Fire Administration reports. The explosions generally are sudden, and are accompanied by loud noise, a flash of light, smoke, flames, and often vigorous ejection of the battery and other parts. A majority of the incidents also started fires in or on nearby objects.
As with other exploding pieces of technology (namely smartphones and hoverboards), it would appear that the problem is linked to lithium-ion batteries.
No other consumer product places a battery with a known explosion hazard such as this in such close proximity to the human body, the Fire Administrations report notes. It is this intimate contact between the body and the battery that is most responsible for the severity of the injuries that have been seen. While the failure rate of the lithium-ion batteries is very small, the consequences of a failure, as we have seen, can be severe and life-altering for the consumer.
In the aftermath of the Florida tragedy, there may finally be some regulations placed around the batteries of e-cigarettes. As it stands, none exist, though the Food and Drug Administration is said to be considering them already. In the meantime, the Centers for Disease Control and Prevention has a few safety recommendations with regard to e-cigarettes and vape pens. The agency cautions users from carrying e-cig batteries loose in their pockets, especially where they might come into contact with coins, keys or other metal objects which can cause the battery to short out.
You should also avoid using your phone or tablet charger to recharge your device. Only use the charger that was intended for the e-cigarette. Furthermore, you shouldnt charge your vape while sleeping or leave it unattended, and should always charge it on a flat surface away from anything flammable. If batteries are damaged or get wet, replace them, and dont mix and match different battery brands or old and new power sources. Finally, avoid altering the device, and do not leave it in extreme temperatures, such as in direct sunlight or in a freezing car overnight.
↧
DTR Missing Order
Hi everyone i placed an order with dtr on 23rd of april i orderd 4x micro flex drive v5 and 10 v4 12mm copper modules for 5.6mm laser diodes items was in the uk at 5th of may and on the 8th of may it says the items was delivered i have not got any item must of gone to the wrong address or something this is not an attack on dtr or anything dtr is a nice guy ive placed lots of orders with him and got the items no prob hope this gets sorted for me.
↧
↧
First continuous room-temperature solid-state MASER
Diamond Solid State MASER
![]()
Detailed Technical Article in Nature
My first thought was application in propellantless RF Cavity thrusters. Since they require very finely tuned microwaves to produce the thrust effect...

Detailed Technical Article in Nature
My first thought was application in propellantless RF Cavity thrusters. Since they require very finely tuned microwaves to produce the thrust effect...
↧
565nm DPSS labby
Let me get this out of the way at the start - this is definitely DPSS. Looking down the barrel shows a square object glued in front of the diode, and the other member who measured his has a very low Vf on the diode. And the final nail in the coffin, this does not have the beam specs of a diode.
Note: these images use a -52 hue on the 565's color. My camera (as many others) will not pick up the color correctly. Now that that's out of the way:
![]()
![]()
The color is very reminiscent of our yellow-green LED's used everywhere. A little more on the yellow side than the green side... 60-40 yellow:green ratio. The beam looks greener than the spot in person, which is a bit odd to me...
For beam specs, not that great. Typical of cheap DPSS sadly... not so good divergence.
At aperture, we have a 3mm spot (pic makes out some splash as the spot, it's a little smaller)
![]()
and at 7.3m (24ft), we have a 14mm spot...
![]()
which looks like 1.507mRad... which isn't terrible, but it's nowhere near as good as I'm used to with these new diodes. But man, is the spot an ugly mess at a distance:
![]()
_______
Onto speckle... this has about as much speckle as a diode has, which tells me it's either a thick linewidth, or not very polarized. Putting it through a polarized lens gives a brighter spot than my 589 does, where the 589 is brighter without the lens. Which will cause it to produce less speckle...
![]()
vs 589
![]()
You can see the speckle through the grainyness if you click the image and zoom in. It's much closer to the speckle a higher power diode puts out:
![]()
Compound that with a line-shaped output from a diffraction grating (rather than the circle it should be)... and you probably explain the lesser speckle.
![]()
So my verdict: very, very cheap dpss.. It would not surprise me if it were direct diode doubled, as I cannot see an IR filter nor can my camera pick up any 808 off this (but it can off the 532).
___
There you have it, the new 565's!
I'll be sharing the 575 as well once I get it (probably in a new thread). That will be the more comprehensive one :p
Until then, enjoy! I'll be updating the album as I take more pics and edit them (though it will be more rare than other albums):
![]()
![]()
Note: these images use a -52 hue on the 565's color. My camera (as many others) will not pick up the color correctly. Now that that's out of the way:


The color is very reminiscent of our yellow-green LED's used everywhere. A little more on the yellow side than the green side... 60-40 yellow:green ratio. The beam looks greener than the spot in person, which is a bit odd to me...
For beam specs, not that great. Typical of cheap DPSS sadly... not so good divergence.
At aperture, we have a 3mm spot (pic makes out some splash as the spot, it's a little smaller)

and at 7.3m (24ft), we have a 14mm spot...

which looks like 1.507mRad... which isn't terrible, but it's nowhere near as good as I'm used to with these new diodes. But man, is the spot an ugly mess at a distance:

_______
Onto speckle... this has about as much speckle as a diode has, which tells me it's either a thick linewidth, or not very polarized. Putting it through a polarized lens gives a brighter spot than my 589 does, where the 589 is brighter without the lens. Which will cause it to produce less speckle...

vs 589

You can see the speckle through the grainyness if you click the image and zoom in. It's much closer to the speckle a higher power diode puts out:

Compound that with a line-shaped output from a diffraction grating (rather than the circle it should be)... and you probably explain the lesser speckle.

So my verdict: very, very cheap dpss.. It would not surprise me if it were direct diode doubled, as I cannot see an IR filter nor can my camera pick up any 808 off this (but it can off the 532).
___
There you have it, the new 565's!
I'll be sharing the 575 as well once I get it (probably in a new thread). That will be the more comprehensive one :p
Until then, enjoy! I'll be updating the album as I take more pics and edit them (though it will be more rare than other albums):


↧
FS: SOLD: 170$ ~2W violet laser MM, host copper brass
dear, i have just complete my building with this host:
- It use 1 x 18650 (not iclude)
- G2 len include
- Cost ship 14usd
![]()
![]()
![]()
[IMG]
![]()
![]() [/IMG]
[/IMG]
![]()
![]()
![]()
![]()
![]()
![]()
my video:
- It use 1 x 18650 (not iclude)
- G2 len include
- Cost ship 14usd
[IMG]
[/IMG]my video:
↧